
Landscaping a Sloped Backyard Terrace: Drainage, Steps, and Planting
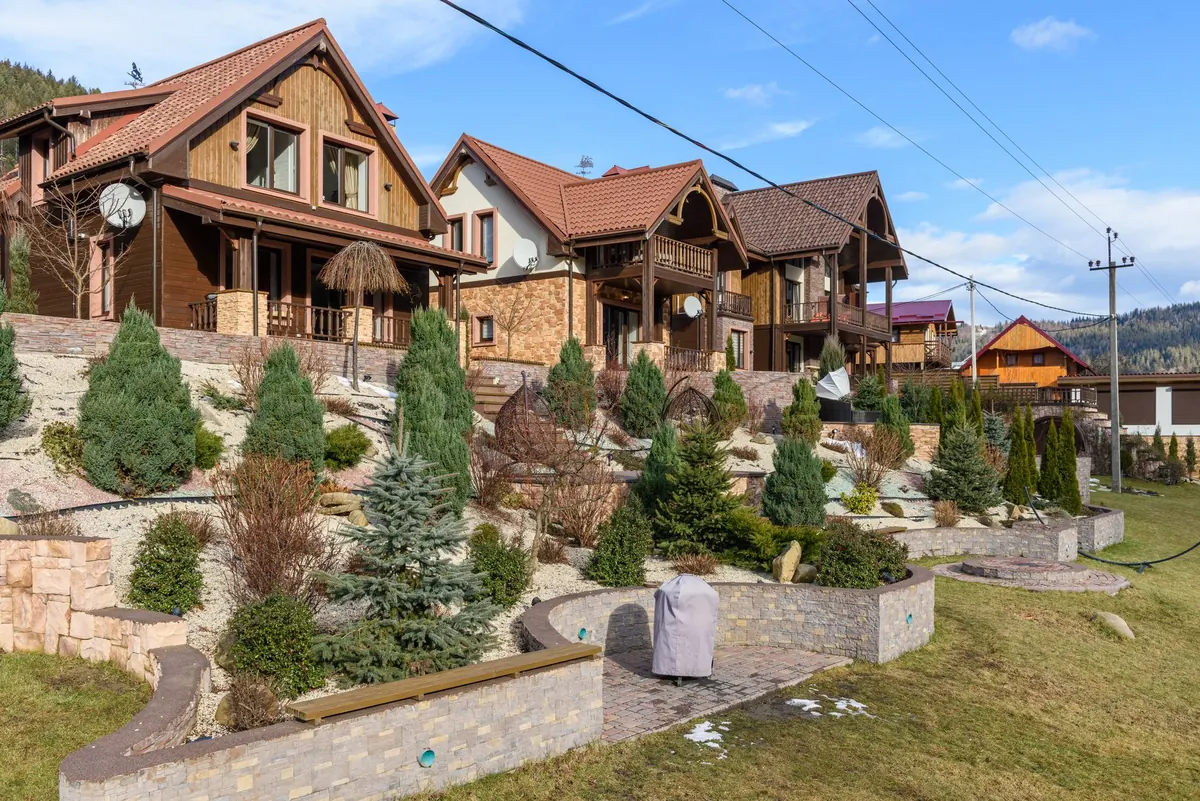
A sloped backyard is a problem right up until you decide to use it. Water moves fast downhill, mowing feels like punishment, and the only level spot is behind the shed. But that same slope is free elevation — raw material for terraces, generous steps and planted pockets that make the space worth sitting in. The order of work matters more than the size of the budget: handle water first, build the structure that holds it, then plant.
Start by Watching Water, Not Choosing Stone
You cannot design drainage from a photograph. Walk the yard during a heavy rain, or in the hour right after one, and watch where water enters and where it stalls. Runoff usually arrives from somewhere you don't control — a neighbour's lawn, a driveway, a downspout that dumps straight onto the slope — and that arrival point is where problems begin.
Some signs are easy to miss until they're expensive:
- Small channels or rills cut across the slope after storms
- Bare soil where grass refuses to establish
- Mulch piled against the downhill side of a fence or wall
- Water still standing a day or two after rain
- Moss, damp patches or a musty smell in one consistent area
Redirecting a downspout or cutting a shallow swale along a contour costs a weekend. Rebuilding a retaining wall that heaved because water pushed behind it costs a season. Water is heavy, and it is the single most common reason terrace walls fail.
Terrace in the Right Order
Terracing means cutting into the hill and using that material to fill outward, creating level benches. Work from the bottom up so you always have somewhere to stand and stage materials, and keep each wall low. Long runs of low walls look better than one tall wall and are far easier to build well.
- Move roof and surface water away from the slope before you dig anything.
- Rough out the terrace levels with stakes and string, checking them with a line level.
- Install subsurface drainage behind where each wall will sit.
- Build the lowest wall first, then work uphill.
- Add steps and paths once the levels are solid.
- Plant last, after the soil has settled through a wet season if you can wait.
Set each wall back from the one below by at least its own height. That setback is what gives a terraced slope its calm, stepped look, and it gives you planting space instead of a bare wall face. As for height, rules vary widely from place to place — a quick call to your local building department before you order blocks or stone is cheap insurance, and taller walls usually need an engineer's input.
Wall Details That Keep a Slope Where You Put It
Every wall needs three things: a base that won't sink, a way for water to escape, and backfill that drains. Dig a trench, fill it with compacted crushed gravel, and bury the first course so only its top edge shows. Burying that first course is what stops the wall from creeping downhill over the years.
Behind the wall, lay filter fabric against the soil, then gravel, then a perforated pipe near the base that runs to daylight at a lower point. Weep holes at the bottom of the wall let any remaining water out. Never backfill with the clay you dug out — it holds water against the wall like a sponge. And keep planting soil and mulch a hand's width back from the wall cap so soil doesn't wash into the gravel.
For materials, dry-stacked stone and segmental block both work well and let you build in gentle curves. Timber is cheapest and easiest but rots; gabions handle heavy water but look industrial. Build with a slight lean back into the slope. It reads as intentional and it resists soil pressure better than a perfectly vertical face.
Steps That Feel Good Underfoot
Bad outdoor steps are usually too steep with treads too narrow, which makes every trip to the compost bin a small act of balance. Aim for a rise between five and seven inches and a tread of twelve to fourteen inches. The old stair rule holds outdoors too: two risers plus one tread should total roughly twenty-five to twenty-seven inches.
Make steps wider than you think you need — four feet minimum if two people might pass — and break long runs with a landing every four to six steps. Landings do double duty as spots for a pot, a lantern or a low-growing plant that softens the edge. On a long slope, a switchback with two shorter flights beats one intimidating staircase.
Set treads on a compacted gravel base, and choose surfaces that grip when wet: rough stone, textured pavers, or timber risers with gravel treads. Add low-voltage step lights wired to a single transformer, and fit a handrail on any run steeper than a comfortable walk. If you move wheelbarrows or carts up the slope, plan a route wide enough for them.
Planting for Cover, Not Mowing
The best planting on a terraced slope does two jobs: it covers soil so rain doesn't sheet off, and it needs almost no attention. Groundcovers with spreading roots — creeping juniper, creeping thyme, sedum, liriope, low cotoneaster — knit the surface together and replace the mowing you were never going to enjoy. Check whether a vigorous spreader is considered invasive in your region before you plant it; some of the cheapest, fastest groundcovers are also the ones that escape into nearby bushland.
Behind the groundcover, use shrubs with fibrous roots — viburnum, spirea, ninebark, hydrangea — for height and structure. Keep trees well away from wall footings; roots lift and crack masonry, and a rough rule is to plant a tree at least as far from a wall as the tree's eventual height. On a wall, plant at the top and let foliage spill over the edge rather than crowding the base.
Terracing changes sun exposure. In the northern hemisphere, a north-facing slope stays cooler and wetter, a south-facing one bakes. Match plants to the aspect of each individual bench, then run drip irrigation on a simple timer and mulch everything. That combination cuts watering, weeding and pruning more than any other single decision.
Living With What You Built
A terraced slope isn't finished, it's maintained. Clear leaves and debris from drains and swales every autumn, and after heavy rain check that weep holes are running and the ground behind the wall cap is still firm. Walk the wall line twice a year looking for bulges, leaning sections or new cracks — small movement is normal settling, but a bulge means water is building up behind it. Keep mulch off wall tops, reseed or replant any bare patch before winter, and don't pile snow against the face of a wall.
Do the water work first, keep the walls low and generous with drainage, and let the plants fill in. Give it two growing seasons, and the slope you avoided will be the part of the yard you use most.
Photo: Max Vakhtbovych / Pexels